Guidance and navigation for the much-admired e-commerce open-end platform WooCommerce

How to use WooCommerce. Source: shutterstock.com
The official statistics of WooCommerce users says it supports over 28% of all web-stores. High chances are, you belong to the other 72% of the store owners who still don’t enjoy the benefits of the free service.
If you do, it’s time to explore its vast opportunities. This article will tell you why and how you can use the WooCommerce tools for your business.
What to expect from WooCommerce
This platform is embedded within the WordPress system – a popular service that allows creating personal and commercial websites. The service community itself is a powerful crowd of bloggers, freelancers, and small business entrepreneurs.

The solution has simple navigation. Users can manage their store inventory easily. WooCommerce facilitates editing product information and financial details, dealing with subscriptions, feedback, mailing lists, etc.
The checkout stage is customizable. Sellers can offer convenient payment alternatives such as cash on delivery, cheques, or credit/debit cards. Different payment gateways can be integrated on demand.
As for additional expenses (such as delivery and taxes), the platform can calculate them automatically for both transaction parties.
It also has built-in order tracking and notifications of order fulfillment. Sellers can access reports on their profits, sales, or item stocks both from the desktop and mobile app.
What’s most attractive about the service is that it works free of charge. Basically, you don’t risk anything while testing it.
Store owners have an opportunity to drive sales using Facebook with the help of a special extension. When you connect your product catalog, you can use dynamic ads to reach shoppers when they’re on Facebook with ads for the products they have viewed on your website. Facebook will then report the success level of your ads. That means you’ll know how many people have visited your store after seeing an ad, and whether or not they have made a purchase.

Store owners have an opportunity to drive sales using Facebook with the help of a special extension. Source: shutterstock.com
Any changes made on your WooCommerce panel will be automatically applied to your Facebook shop too. The power of this social network will definitely expand your client base and boost your profits.
So, if you’re ready to give it a try, let’s move on.
How to use WooCommerce
1. Install
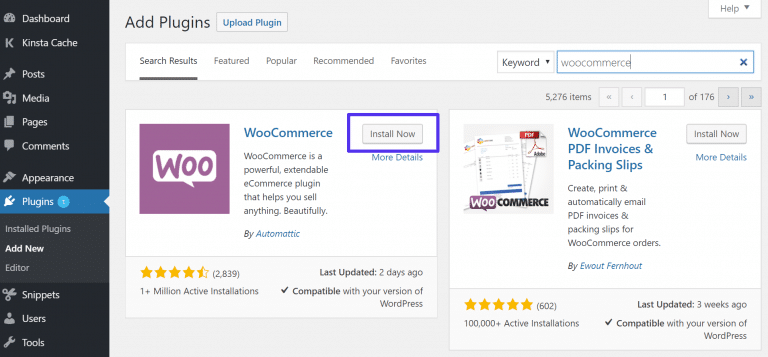
There are two ways to begin using the service. You can either download the WooCommerce plugin for free from the WordPress repository or do it from within your dashboard.
To install it from your dashboard follow the next steps. Find WordPress Admin > Plugins > Add New, enter “WooCommerce” in the search field, and click on “Install Now.”
2. Activate
Once the plugin is installed, you’ll see a blue “Activate” button in the upper right corner. Press it to start.
3. Set up
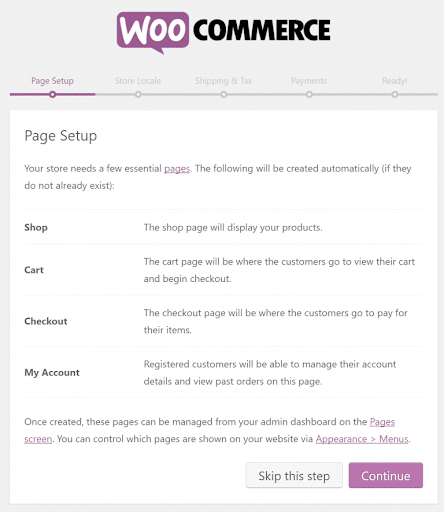
Next, you’ll see a setup wizard with helpful tips. You can go through a tutorial or skip it.
WooCommerce creates a few basic pages for you automatically. They include a shop, cart, checkout, and my account. Click on “Continue” to enable the creation and proceed.
The next page – Store Locale – allows you to choose the country and/or state of your store (warehouse), preferred currency, and units of measurement for your products. Choosing them depends on your target audience. Whether you’re going to sell to local communities or aim for international sales, WooCommerce has got you covered.
On the shipping & tax setup screen, you can choose the type of products you sell and how you’re going to deliver them. Then you may enable sales tax if required. Once you’ve chosen the applicable options, click on “Continue.”
4. Choose payment gateway
If you wish, you can use a third-party application service to handle credit card payments from your clients. Stripe is free of charge as it partners with WooCommerce. However, you can also choose popular PayPal.

Additional payment methods can be added later and managed from the Checkout Settings page. This way, you can start with the basic options and further improve the checkout experience based on your clients’ preferences and feedback.
For instance, you can find Venmo in the extensions tab. It is a digital wallet that lets you make and share payments with friends. If you choose to let your clients pay over time, you can add PayPal Credit add-on. Your customers will get 6 months special financing on purchases of $99 or more without incurring additional interest. Alternatives like those will increase your conversion rate allowing more immediate purchases of expensive products.

You can also choose popular PayPal. Source: shutterstock.com
WooCommerce also provides offline payment methods such as cash-on-delivery, bank transfers, or cheques. You can reach underbanked social classes and regions, survive banking crises, and serve with flexibility.
5. Manage Inventory
Now that the setup process is over, you can start filling your virtual store with the real products for sale. Your WordPress dashboard now offers the Products tab. Here you can list items you produce or resell.
Go to Admin > Products > Add Product to add your first item. Name it and add a brief description. In the product data screen widget, you can select whether or not the item is virtual or downloadable (digital).
You can enter in the regular & sale prices in the General tab. The latter will be shown to the clients during the promotion time.
The Inventory tab allows you to enter the quantity of the product, change stock statuses (in/out), and enable backorders. Here you can mark the product as individually sold. This will be helpful for avoiding misunderstandings.

The Inventory tab allows you to enter the quantity of the product, change stock statuses and enable backorders. Source: shutterstock.com
In the Linked Products tab, you can add upsells, cross-sells, and product grouping. Let your customers see accessories and supplementaries at once. You can also help fashionistas quickly assemble the image from the promotion picture in the event you sell clothes.
Attributes section allows you to enter in specific details of the product that will be displayed under an Additional Information tab in the front end version of the product page. Use your imagination or edit the page according to the FAQs from prospective buyers.
Check the Advanced tab for more customization.
6. Manage your e-store
In the WooCommerce tab that also appears at your dashboard after installing, you can view orders, coupons, and reports, as well as customize settings and add new extensions.

Do not ignore your statistics. Source: shutterstock.com
Do not ignore your statistics. It empowers you by showing your flaws and successes. Improve your presentation and services with all the necessary tools.
Various sections let store owners choose their shipping methods, modify their account data, automate and provide contacts for customer support.
7. Take care of technical details
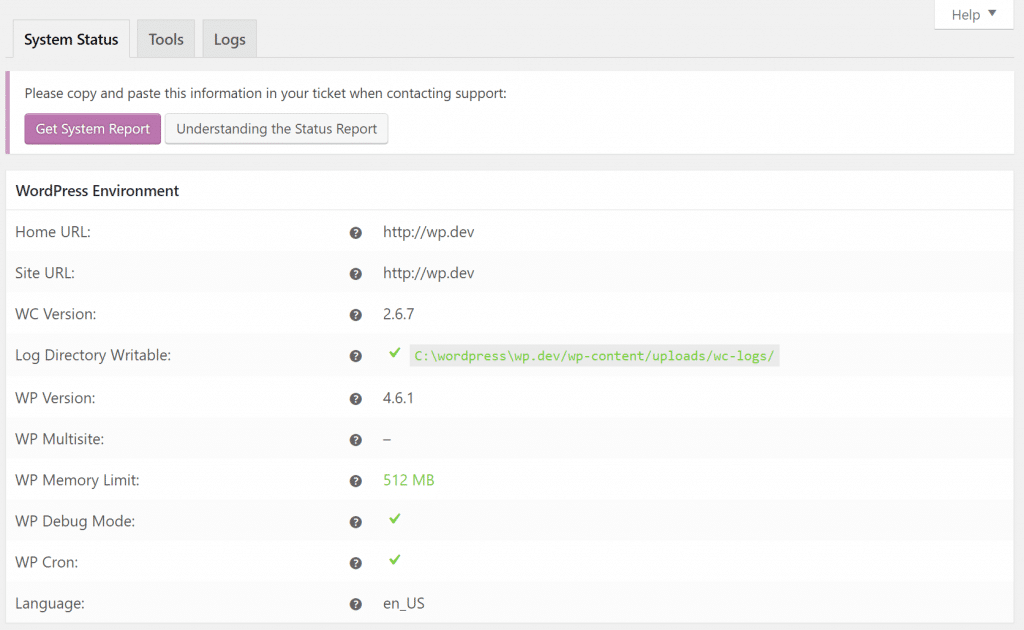
WordPress Admin > WooCommerce > System Status stores all your back-end information — your WooCommerce/PHP/MySQL/etc. versions, size limits, logging, etc. In the Tools tab on the same page, you can clear your website caches, install new options, and reset settings to the default.
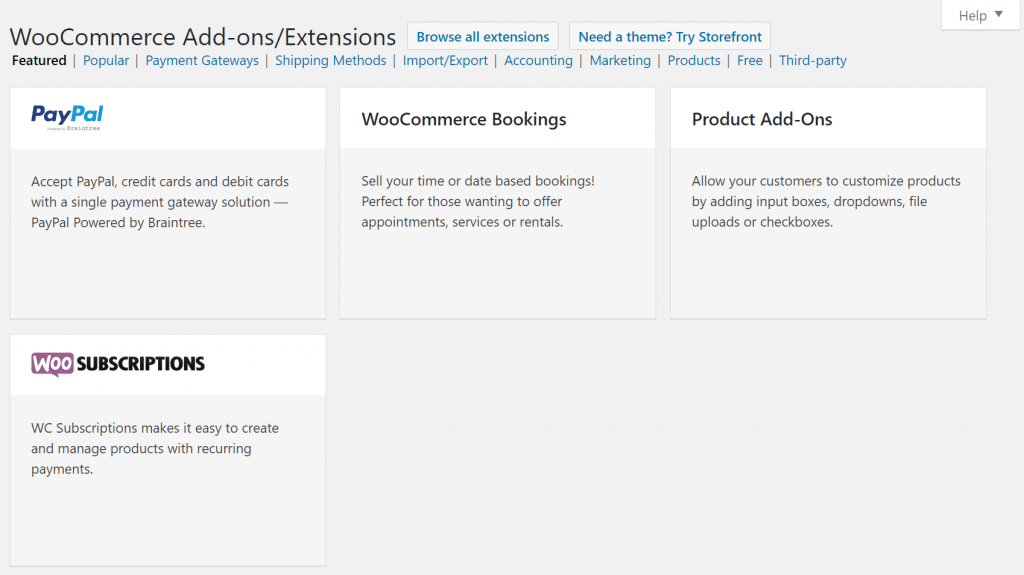
8. Add extensions
There’s no limit to perfection. Standard options are only the beginning of your pleasant journey with WooCommerce. Explore the extensions in the Add-ons Tab.
Themes and plugins are user-centered. They will enhance your selling experience and help you promote your brand. Sometimes the coloring schemes, the font types or sizes matter even more than the products themselves. We live in the age of visualization. Take that into account.
The plugins will give you more opportunities to individualize your store, make it stand out among the competitors. There are both free options and paid extensions for advanced sales.

There are both free options and paid extensions for advanced sales. Source: shutterstock.com
If you provide any services rather than shipping goods, Bookings extension helps to schedule for virtual classes, online appointments, or rentals.
Membership will provide access to restricted content or goods. It will come in handy if you wish to create a VIP category of your clientele.
There are more options for selling subscriptions or product bundles.
The optimization will become easier with Zapier. You can automate your WooCommerce store with familiar cloud services such as Google Drive, Dropbox, Zendesk, MailChimp, Campaign Monitor, FreshBooks, and others. The add-on will automatically send order, customer and subscription data triggered by specified actions or events.
For free security, insights, and monitoring, connect to Jetpack. You’ll get instant notifications about your store’s downtime and any performance-related issues. Furthermore, it secures your site with authenticated customer logins and prevents brute force attacks. All this and more is free of charge.